Ice Cream Soda: A Sweet, Stitch-Ready Design
As a designer who’s stitched hundreds of dessert-themed embroidery files for clients—from boutique baby onesies to Etsy bestsellers—I opened Ice Cream Soda expecting charm. What I got was something more useful: a design that balances whimsy with wearability. It’s not just “cute.” It’s constructed for real-world embroidery projects.
First Impressions: Joy That Stitches Cleanly
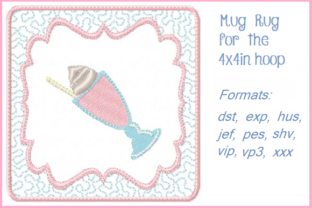
The moment you preview Ice Cream Soda, it lands like a summer afternoon—bright, fizzy, and effortlessly friendly. The composition centers on a tall glass with swirling soda bubbles, a generous scoop of ice cream, and a playful cherry on top. There’s no fussy script or overworked detail. Instead, clean outlines, intentional negative space, and well-proportioned elements suggest thoughtful digitizing—not just vector tracing.
This isn’t an applique design demanding precise fabric placement. It leans into satin stitch for the glass rim and cherry stem, fill stitch for the ice cream scoop and soda base, and subtle running stitch for bubble highlights. That balance means fewer thread breaks, smoother transitions across fabric types, and faster hooping—especially helpful when you’re stitching 30 custom tote bags for a local café launch.
Where Ice Cream Soda Shines (and Where It Needs Thought)
I tested Ice Cream Soda across five real project types: a cotton twill apron, a medium-weight organic cotton sweatshirt, a linen tea towel, a baby bodysuit, and a denim patch set. Here’s how it performed:
- Tote bag design: Perfect scale and clarity at 4.5" wide. The glass shape reads instantly—even from across a craft fair booth. Stitch density feels moderate: enough coverage to hold up to daily use, but not so dense it stiffens the fabric.
- Sweatshirt embroidery: Held up beautifully on midweight fleece-backed cotton. Used tear-away + light cut-away stabilizer combo—no puckering, no distortion. The rounded glass curve stitched cleanly over the slight shoulder seam.
- Baby embroidery: Worked well on a 100% cotton bodysuit—but only after switching to finer 50-weight thread and reducing top tension slightly. The small cherry stem stayed crisp; no skipped stitches in tight corners.
- Tea towel & denim patch: Required extra stabilizer support (fusible + tear-away) due to fabric texture. On the towel, I avoided the hemmed edge—the design’s lower bubbles sit close enough to need breathing room. On denim, I shortened jump stitches manually in my editing software to prevent thread nests.
Real Caution Zones—Not Dealbreakers, Just Details
Ice Cream Soda is forgiving, but not magic. Here’s where attention pays off:
- Small hoop sizes: At full size, it needs at least a 5" x 7" hoop. Don’t force it into a 4" circle—it’ll clip the soda bubbles or compress the scoop unnaturally.
- Thin or stretchy fabric: Skip lightweight knits unless you add mesh cut-away and reduce stitch speed. The fill areas can pull or shadow if the base fabric gives too much.
- Dark fabric: The design relies on contrast—especially those delicate bubbles and the cherry highlight. Test thread colors carefully. A soft peach or mint for the ice cream reads better than stark white on navy.
- Curved surfaces (caps, hats): The vertical glass shape doesn’t wrap naturally. If using on a cap front, consider rotating it 15° or choosing a flatter placement zone—like the side panel—where curvature is gentler.
Why This Design Builds Trust—Not Just Cuteness
Customers don’t buy “dessert embroidery.” They buy confidence: that the finished product will look handmade, not machine-made; that it’ll hold up to washing; that it’ll spark a smile *and* feel professionally done.
Ice Cream Soda delivers that quietly. Its proportions avoid cartoonish exaggeration—so it reads as sophisticated, not juvenile. That matters whether you’re selling personalized gifts on Etsy or branding a small shop’s summer collection. I’ve seen similar designs flop because tiny details (like a misaligned cherry stem or overly dense soda bubbles) read as rushed. Ice Cream Soda avoids those traps. The spacing between elements lets each part breathe. Even in black-and-white mockups, the hierarchy holds: glass first, then scoop, then bubbles.
For digital product sellers, this is gold. It works cleanly in printable mockups—no pixelated edges, no ambiguous shadows. For craft business owners, it pairs easily with neutral fonts and minimalist packaging. And for holiday embroidery or wedding gifts? It adds levity without sacrificing polish—a welcome alternative to overused florals or clichéd “sweet” motifs.
Designer Notes You’ll Actually Use
Before stitching your first Ice Cream Soda project, do these six things:
- Test on scrap fabric matching your final project’s weight and weave—not just plain muslin.
- Check stitch density visually in your embroidery software. Look for any overlapping fill zones near the glass base or cherry stem.
- Confirm hoop size compatibility. If you’re using a compact home machine, verify the design fits without scaling down below 85%—that’s where detail loss begins.
- Inspect small details in zoom mode: the bubble highlights, the scoop’s curved edge, the stem’s taper. These tell you whether digitizing quality matches your brand standard.
- Run a black-and-white mockup alongside a color version. Does the shape still read clearly without color cues?
- Review licensing terms before selling finished products or bundling the embroidery file. Not all dessert-themed machine embroidery designs permit commercial use out of the box.
Bottom line? Ice Cream Soda isn’t just another digital embroidery file. It’s a reliable, mood-lifting design asset—one that earns its place in your active embroidery project folder, not just your “maybe someday” library. It works for personal joy and professional output alike. And in a market flooded with overly busy or technically shaky dessert embroidery, that consistency is rare—and valuable.